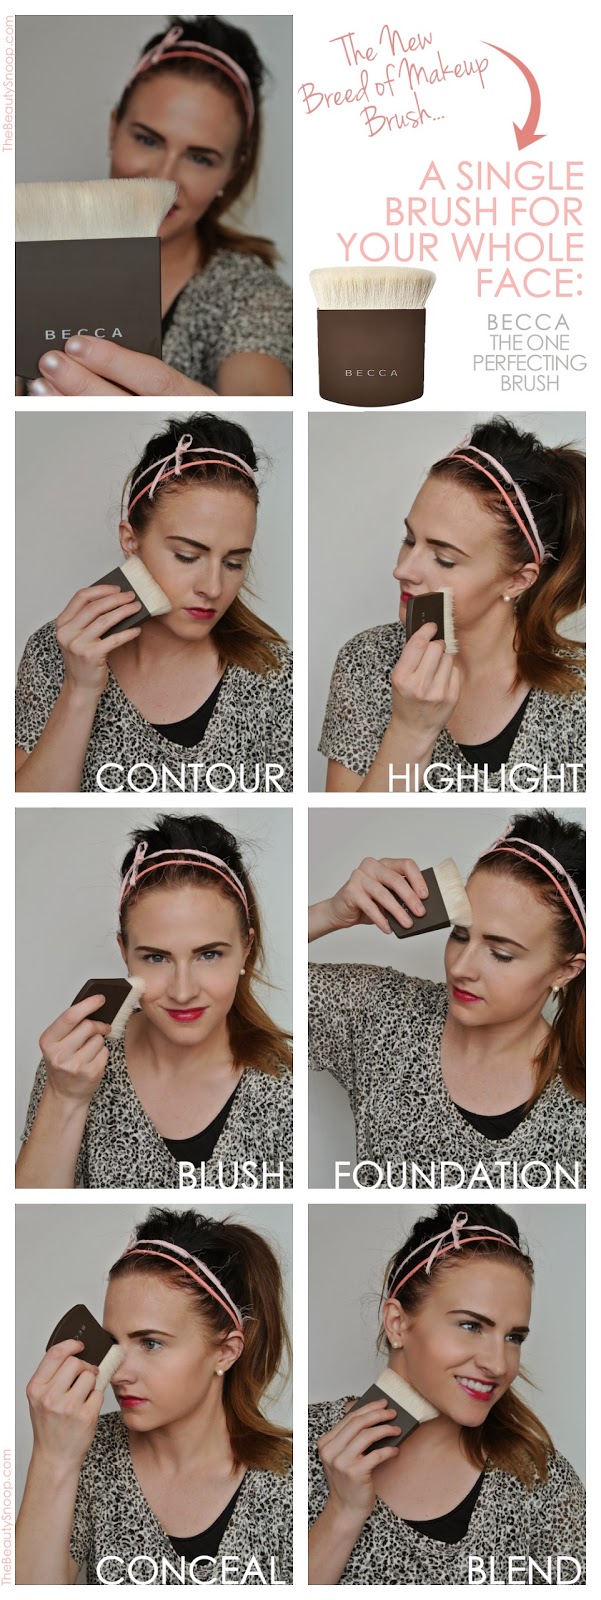
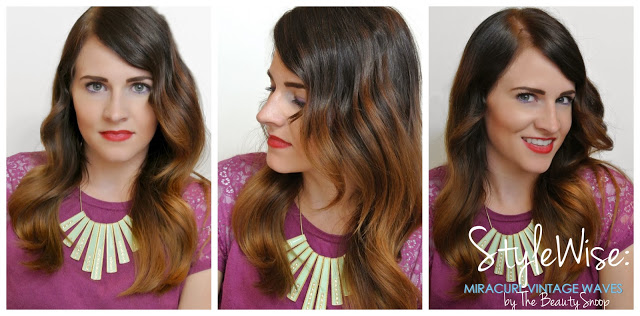
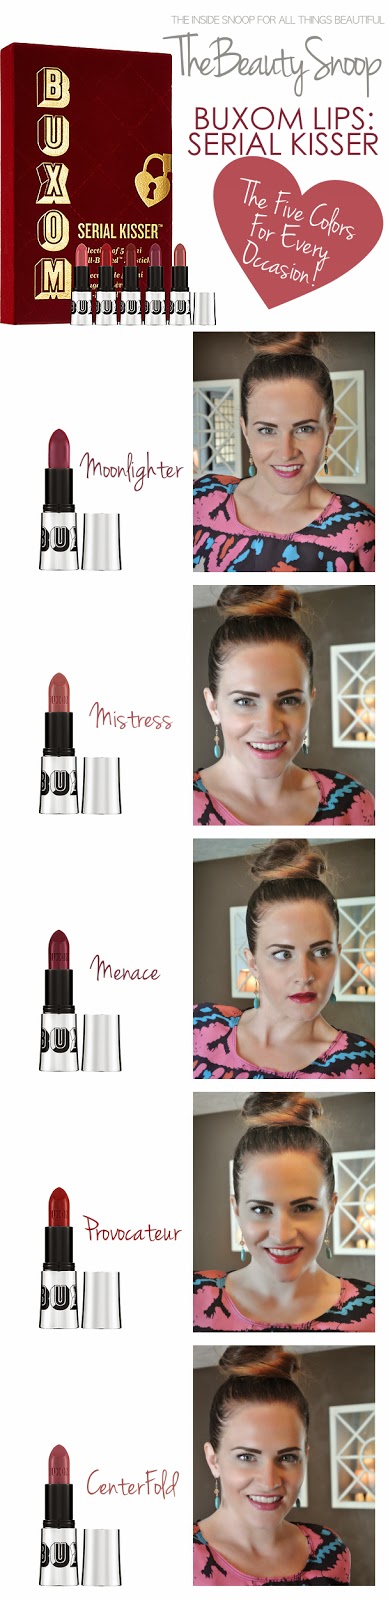
NOW TRENDING: VIOLET TULIP EYES WITH STUDIO5

How to wear purple eye makeup

1-

FLOWER Beauty Creme Eyeshadow

[Orchid-ing Around]

2-

Maybelline Color Tattoo

[Painted Purple]

3-

FLOWER Beauty Eyeshadow Chubby

[Keep Your Pansies On]

4-

Rimmel Scandaleyes Eye Shadow Crayon

[Paranoid Purple]

5-

Urban Decay Glide On Eye Pencil

[Empire]

6-

NYX Love in Florence Eye Shadow Palette

[xoxo, Mona]

7-

Avon True Color Eyeshadow Quad

[Purple Pop]

8-

Maybelline Expert Wear Shadow Quad

[Lavender Smokes] 

9-

NYX Baked Shadow

 [Violet Smoke]

10-

NYX Creme Shadow

[Deep Purple]

11-

NYX Jumbo Eye Pencil

[Lavender] 

12- *Not pictured, but still fabulous

Almay Color Softies

[Lilac]

Hello Snoopers! Today I am back on Studio5 talking about this seasons hottest color in eye makeup... Violet Tulip. You may have heard that Pantone named Radiant Orchid the color of the year, but you may not be aware that they also name 10 colors per season as well. These 10 colors show up in our fashion magazines, on the store racks, and in beauty looks as well.

And while Radiant Orchid is beautiful, it is quite a pinky shade of purple that isn't quite as easy to find or wear when it comes to makeup. Her sister shade Violet Tulip however, is stunning for winter/spring and is easily one of the most flattering makeup colors universally.

Check out my guide to wearing Violet Tulip in the

video

clip below and then get your booty over to these links above to pick up your own perfect shade of purple.

Tips for wearing Violet Tulip:

1- Start with creme shadows if purple makes you nervous

. The creme formula is more forgiving and is blendable and spreadable for a much longer time before it sets in place. You can use your finger to smudge cremes which gives you more control over the pressure and allows you know exactly where the product is being placed. Start with a small amount, you can always layer and add more to give a brighter pop of color. If you're a makeup maven, then feel free to use powder shadows- just be sure your precise with the application so your purple doesn't run with the wind!

2- Keep purple lower than the crease of your eyelid

. To avoid looking cray-zy focus the color on either the lash line

or

the crease, but always remember to never let purple venture up towards the brow bone. This will keep the color more 'hidden' and will give a beautiful revealing effect when you blink your lids.

3- For a mature look (if your eyes have more 'wisdom' in them) keep the shadows glitter-free

. Glitter and shimmer should be reserved for a younger lady and for night time events. To wear purples during the day, keep them matte and pair them with complimentary neutrals like taupe and navy blue. Muted purples are a great option too, so look for tones that have grey or pink in them to subdue the purple tone slightly.

Remember that purple is an accent and works nicely with other colors. You certainly can go all-out with this look and wear a whole eye of purple, but there is no need to. Pair your purple with neutrals or just use purple on one portion of the eye, and you'll still get the wow factor without going over the top.

Enjoy your day, meet me over on

instagram

?-

Follow on Bloglovin

NOW TRENDING: NUDE NAILS FOR FALL 2014

ideas for nude nail art and design

Now that New York Fashion Week has come to an end, I always love going back through the collections and spot patterns that weaved through many of the designers looks. Without a doubt

the biggest nail trend was the return of the Nude Nail for Fall

.

Not that nude is ever un-beautiful... it's just too classic for that. But it certainly hasn't been the talk of the town in the last few years, because the focus has been on detailed nail art and the power of the gel nail formula that has seemingly taken over the world.

But I think it's safe to say that the return of the nude nail will be big this Fall, and while that may seem boring, check out some of the variation in these pics above! Splashes of color mixed with the nude are stunning in my book, and the use of color blocking has now entered the scene as well. Those gold and nude combos are my favorite, hands down.

I love the subtleness of this trend and the attention to detail that it brings to any ensemble. So get your bright Spring and Summer colors in while you can, then be ready for a classic [subtle] taste of beauty come Fall.

Do you like these looks? Let me know if the comments below, and be sure you come back Friday for a new episode of Studio5 where we are dishing about the newest color in eye makeup...

Violet Tulip

!

Follow on Bloglovin

THE BEST OF: LIP SCRUBS

Lip Scrub Products, Sara Happ, Bliss Fabulips, Fresh Lip Polish, Bite Lip Scrub Review

Fresh Sugar Lip Polish

  |  

Bliss Fabulips Scrub

  |  

Bite Whipped Lip Scrub

  |  

Sara Happ The Lip Scrub

Lately my lips have been through the ringer- frigid cold air and lots of wind, mixed with dry indoor heaters, make for seriously parched lips. It is one of my biggest [beauty] pet peeves, but I have learned to concur the winter weather with the brilliance that is... 

LIP SCRUBS

.

If you've never used a lip scrub, let me give you the 411. Lip scrubs are usually composed of a granulated sugar and moisturizing essential oils of some kind. The sugar granules gently slough off the dead skin on the lips, while the oils repair and replace lost moisture. The combo is perfection, and you'll be surprised what a difference it makes for the softness and appearance of your lips. No amount of lip balm can do what a scrub can, and that's a fact.

The one that started it all is the

Lip Scrub from Sara Happ

. She introduced scrubs specific for lips about 5 years ago, and the industry has grown ever since. The Sara Happ line consists of amazing flavors including Peach, Peppermint, Blood Orange and more! They are so yummy, I swear you'll want to eat the whole jar. But don't.

Others that I love are the

Fresh Sugar Lip Polish

and

Bliss Fabulips Scrub

, both are great options and have luxury oils infused in the formulas. The last one pictured is by the new line

BITE

, and to be honest I haven't tried their scrub yet, but their

lipsticks

have recently rocked my world so I can't imagine the scrub is anything less than amazing!

Since I discovered the amazing results of lip scrubs, I have since started experimenting with making my own too. Next week, I'll give you my favorite recipe so you can join in on the fun! xoxo

Follow on Bloglovin

HOW TO WEAR DARK LIPSTICK WITHOUT LOOKING LIKE THE JOKER

tips to avoid bleeding lipstick

I love wearing dark lipstick, but I've had too many embarrassing moments when I realized that the color had slipped off my lips and on to my face in public. After a few of those 'uh..what the hell!?!' moments, I started looking for a better answer- and after a lot of trial and error, I finally discovered the amazingness of using a physical barrier around the perimeter of my lips to keep the color in place.

It all started when I had tried to use my finger to wipe away some excess lipstick that had snuck passed the perimeter of my lips. I was left with a pink stain on my skin that needed to be covered up ASAP otherwise I would have looked like the joker, and let's be honest- that is NOT a good look.

I would have reached for the concealer, but I feared getting my fingers in to the mix again, would only smear things even greater. So out of shear desperation I reached for my nude eyeliner, and to my surprise it worked perfectly and the rest is history!

Since then I have researched, and found out that others use this technique, so I'm certainly not the only one who's had the idea, but I wanted to share it with you because it has been a life saver for me, and now hopefully for you as well.

Now, before I apply any lipstick I pre-line with a nude liner to create a physical barrier for the color and the clean up the perimeter especially around the corners of my mouth where color can easily wander. In addition to all that goodness, the flesh tone give an optical illusion of fuller lips by highlighting those nice curves!

My two favorites are the Nude

Waterproof Kohl liner from Rimmel London

which also comes in Taupe and Brown for darker skin tones. And even better in my opinion is the

Chella Cosmetics Highlighter Pencil

which comes in Ivory, Cinnamon, and Latte so all your colors are covered! It's an easy fix and makes a world of difference- give it a try I don't think you'll be disappointed!

Love to you all! Let me know in the comments below if you have any other good lipstick techniques to share. xoxo

Follow on Bloglovin

THE BEST AT-HOME FACIAL PRODUCTS & ROUTINE

DIY facial, at home facial

Last week I shared my love for

luxury spa facials

, and the amazing results they yield for your skin and well being. But not everybody has the ability to treat themselves to a spa visit- and as a busy working mom, I understand that sometimes there just aren't enough hours in the day to make pampering a priority.

If you can't hit the spa- but you'd still love to get the great benefits of a facial, take a page from my book, and put those kiddos to bed so you can

indulge in my signature at-home facial

.

You can certainly use the products you already have at home, but if you need to fill in any holes you may have in your arsenal- these are my favorite products that I always go back to time and again. Follow the order listed above to get the best results, and you'll be feeling brand new in no time!

1-Cleanse

Start by gently removing your makeup and preparing the skin to receive all of the goodness coming its way. I swear by the

Triple Oxygen Foaming Cleanser by Bliss

- it's foams to a beautiful creamy consistency, has a pleasant citrus smell and is gentle enough to use on your eyes.

2-Steam

By far the best trick I know, is to borrow your slow cooker/crock pot from the kitchen (or buy a second 

cheap crockpot

if you don't like the idea of duel usage) and prepare some hand towels to use for steam therapy. Take a few large wash cloths or hand towels and run them under hot water until saturated. Ring them out and then roll or fold them till they fit nicely into the slow cooker. Place the cooker on high and let the towels heat through for about 20 minutes with the lid on. After your cleanse, take a hot towel (test the temperature first) and place it over your face leaving your nose and mouth exposed for breathing. Press the towel into your skin while taking a few deep breaths- you can add a few drops of essential oils to the towels for added zen. After the towel has cooled, gently wipe from side to side to remove any additional makeup or cleanser from the face.

3-Exfoliate

Next up...exfoliation! I love to alternate between my

Clarisonic Mia Brush

, and a good old fashioned sugar scrub. But remember not to use both in one session because you could cause some damage. The sonic brush is so quick and easy- and it does all of the work for you. While the

Suki Exfoliate Scrub

takes a little more effort, the scent is enough to take you to heaven and it leaves your skin truly polished.

4-Hydrate

This step in the facial is all about relaxation and rehydration. Apply your favorite masque and let it go to work for 10-15 minutes, while you kick back with a magazine or paint your toe nails. I love the

Boscia Blue Calming Masque

- mostly because I think it is fun to peel it off afterward! It is very hydrating though, and leaves the skin quenched. A second steam towel is great post masque as well!

5-Tone

Toners are designed to balance the pH in your skin after you've cleansed which helps so you don't have that 'tight' feeling that can occur. I just discovered the

Pixi Glow Tonic

, and I am hooked! Use a cotton round to liberally apply your toner and then let it sink in for a minute or two before moving on.

6-Replenish

Americans are just coming around to the idea of using oils in our haircare and skincare. We've been such a 'clean' obsessed nation, that we've dried ourselves out by stripping away natural oils. Thank goodness the trend is reversing and we are finally seeing the beauty behind supple skin and hair.

Tarte Pure Maracuja Oil

is one of my favorite beauty secrets. (in fact I can't believe I'm telling you about it, cause I really wanna keep it all for myself!) Press a few drops into your skin especially on dry areas like your under eyes and cheeks. Your face will soak it in, then it will scream "THANK YOU!!!"

7-Repair

Finish with your favorite moisturizer or serum like my cult favorite

Image Vital-C Anti Aging Serum

. Be sure you work all the way down your neck as well. You may need to apply a

lip balm

and

eye cream

as well to repair any moisture lost from the steamy hot towel action.

So there ya have it, my routine for a perfect at-home facial. And while it may seem like a lot of steps, you can certainly cut out what you don't have and substitute what you do. But if you build up your supply of high quality products, you'll be able to get amazing skin results just like the pros do. If you can schedule this routine in twice a month, you'll notice a huge difference in the way your skin looks, and how your makeup wears. Cheers!

Follow on Bloglovin

***Be sure you check to see if you won the

Hair Compare

and

Lumist

Giveaways.

5 THINGS YOU SHOULD KNOW BEFORE GETTING A FACIAL

spa facials, the best facials, grand america spa

On today's episode of

Ask The Expert

, I am delving into a topic that is dear to my heart [and face]. Often when people ask me for skin advice, I mention to them the benefit of getting a spa facial every couple months. I firmly believe in the power of a facial- but I am often met with the response... 'I've never had a facial.' when I suggest this. And while that response makes me sad (for that person) I can understand why it is a treatment that not every women is familiar with. It is not nearly as common as say, a massage, and even those are a luxury service that many women aren't able to indulge in. But I am going to go out on the limb and say that I believe a facial shouldn't be viewed as a luxury, but as a necessity. So if you've never had a facial, let me tell you what you can expect.

5 things you should know before you get a facial

1- Determine what your there for before you go: relaxation or treatment

Just like a massage, there are varying types of facials- some that are geared towards pampering and relaxation, and some that are geared towards treatment of specific skin issues. Knowing ahead of time what your goals are for the experience will ensure that you get the best results, and that your skin therapist heads sown the right path. Relaxation treatments typically consist of a thorough cleansing, minor exfoliation, steamy hot towels, and luxurious masques. While treatment facials are comprised of stronger exfoliators that may sting or tingle, extractions of pimples and blackheads, and the use of agents that may cause peeling (the good kind of peeling that means new shiny skin is on the way!)

Be sure you talk to your skin therapist about your skin concerns and goals, so you get a custom result.

2- Don't book your facial on the eve of a big event

Facials often leave your skin a little red, especially if pimple extractions took place. [they are my favorite part... weird right?] Give yourself plenty of time to recover from any redness or peeling that may occur in the couple of days following your treatment. It's always better to be safe than sorry, so I recommend about 3-4 days after your facial for anything major such as a wedding or event. Your skin will still be glowy!

3- Speaking of GLOWY- shiny has a whole new meaning!

Post facial, you'll be squeaky clean like you've never been before! After several cleansings, hot towels, steam, and luxurious products- your skin will be completely free of any dirt, buildup or makeup. This means that when you walk out of the spa and back into the dressing room, you may not recognize yourself when you pass by a mirror. It's ok- many of the other spa patrons will be in your same boat. And while it is tempting to quickly apply your makeup to feel human again- I suggest you refrain as long as possible to give your skin a chance to really breathe, free from all that gunk. This means yes, you'll have to walk to your car with a bare face, and yes, your husband may look at you a little sideways- but if you can handle it... 12 hours sans makeup will do your skin some serious good!

4- A facial isn't just for the face

While the vast majority of the treatment concentrates on the face, the rest of your body gets some good vibes too! The facial includes work on the neck and upper chest area, called the decollate. It's all part of the body that needs to be cared for to help prevent aging, and to protect against the suns UV rays. So your therapist will continue the use of the steamy towels, masques, and lotions down on to your chest as part of the whole regimen. Beyond that your therapist will also offer a nice massage to the hands, head, shoulders or feet- usually while the treatment masques are working their magic on your face. It's incredibly relaxing and all around good for the body and soul.

5- The benefits of a facial go well beyond a clean face

Not only does your facial treat the skin, it also treats the systems in the body that provide nourishment to the skin and its cells. While I was earning my esthetics license, I became interested in the lymphatic system and its role in the bodies health. The lymph system resides just under the surface of the skin and can be triggered to carry toxins out of the body with touch. Facial, neck and chest massage trigger movement in the lymph system that in turn, increases blood flow, circulation, and healthy cell turn over. All of which have huge benefits for your over all health and appearance. Pretty amazing, right!?!

So, if your lacking some luster in your skin, struggling with fine lines or acne, or just need an hour away for some 'me-time'- I highly recommend you book yourself a facial. You won't regret it! Be sure you come back next week to learn about my at-home facial routine too. xoxo

Looking for a great spa to try?

I love visiting new spas any time I am on vacation- and what I have learned is that hotel spas are always a great place to start because they are superb with customer service, and usually have the best bonus amenities such as saunas, steam rooms, and pools that spa guests can utilize. Check out the hotels in your city too, they always accept non hotel guests for their services and they love to have locals stop by.

If your a Utah dweller like me, I recommend you visit

The Grand Spa

inside of the Grand America hotel in downtown Salt Lake. It's been a favorite of mine for years, but last week I went by to see their newly renovated space and snap a few pics for you guys to see. They offer amazing facial and body treatments, and my skin therapist Shelly is super knowledgeable and does fabulous work. My husband and I love the couples treatments too, but now they've amped up their goodness with fresh made creme brûlée yummies, and a 12 head

experience

shower in all of the couples rooms.

Valentine's Day

is calling my name!

HAIR COMPARE: THIS OR THAT WINNERS WITH STUDIO 5

Bumble & Bumble Pret a Powder, Hot Tools Gold Barrel Curling Iron, CHI Luxe Sparkle Spray, Alterna Caviar, Pureology Root Lift Reviews

Today I am stopping by Studio5 TV to dish about my knock-out hair products that leave others in the dust. We are comparing two types of products that offer similar results, but ultimately, only one can stand supreme.

Take a look at my list below and be sure to check out the

video

 for more details.

Hot Rollers vs. Curling Iron

1- Winner:

Curling Iron by Hot Tools

While hot rollers are making a comeback in the beauty world they still don't offer the variety of curl patterns that a good ol curling iron does. By utilizing different wrap techniques, as well as varied temperature and density of each strand, you can achieve numerous looks that just don't come from a hot roller. The other major problem with rollers is that you don't know what the curl will look like until after its set and cooled, and by then it may be too late to reform the curl without having to start all over by wetting the hair or at the very least re-heating the roller and waiting for it to set again. For those of you with REALLY resistant hair that won't take curl, the hot roller may be the only option, but for most of us the curling iron still wins. My favorite is the

Hot Tools Gold Barrel

in the 1-1/4 inch size, it's versatile and affordable... a perfect combination!

Creme Conditioner vs. Spray Conditioner

2- Winner:

Creme Conditioner by Alterna Caviar

Spray or leave-in conditioners were designed to give an extra bit of moisture to hair and to help close down the cuticle on the outer shaft of the hair. This helps give the appearance of healthier and shinier hair, but it is not conditioning enough to skip the creme version in the shower. Even fine haired people need to be conditioning to replace the moisture that is lost in the mid to ends of our hair. Skipping conditioner can lead to breakage, dryness, and static electricity. If you feel like conditioner weighs your hair down, your either applying it wrong or using the wrong formula.

Alterna Caviar

offers several varieties of conditioner for normal, mature, or fine hair. I love them all! They smell amazing and turn your hair into instant silk. I seriously cannot get enough!

Shine Serum vs Shine Spray

3- Winner:

Shine Spray by CHI

Everyone loves the idea of shiny hair, but if your not carful you can go from shiny to greasy in a snap. Shine serums are made from heavier silicones that coat the hair and can leave it looking greasy. My experience has also been that serums tend to build up on the hair and create a film that can be hard to remove as well as making blow dry more tedious. Using a shine spray to finish off a look after its been styled gives that added shine your looking for, but the thinner formula is much easier to control and washes away much better. The

CHI Luxe Sparkle Shine Spray

leaves hair with a light reflective quality that I love, but it doesn't leave hair greasy. Always remember less is more when it comes to shine!

Root Boost vs. Mousse

4- Winner: Root Boost by Pureology (

salon locator to purchase

)

Adding lift to the hair is one of the most requested attributes be get at the salon. Bouncy volume can be hard to come by though, and so we turn to products for help. While mousse will add volume and subtle hold, it can also be very drying because it contains alcohol. It's consistency is also very hard to control, and you can end up with heavy application in one spot and zero product in another. I opt for a root lift instead which offers a much more controlled application, and targets the product only where its needed... at the roots. The pin point nozzle on

Pureology's Root Lift

is perfect for getting the product right down to the scalp and giving you great volume. It's a must-have.

Dry Shampoo Spray vs. Dry Shampoo Powder

5- Winner:

Dry Shampoo Powder by Bumble & bumble

While I love dry shampoos in general for stretching the time in between hair washes, and for offering texture to hair, I find that spray in varieties tend to break down in the hair sooner and lose their oomph. The spray versions offer more options as far as colors and scents, but for a lasting experience powder is the tops.

Bumble & bumble Pret a Powder

acts as an oil absorbing machine that lifts hair and refreshes it perfectly. A few sprinkles of this stuff at the root will boost your strands back to life and combat any unwanted smells (you know what I mean, right?) It is white however, so those with dark hair need to take extra care to only apply the product beneath your part lines to avoid looking chalky.

You can shop all of my winners below,

plus one lucky winner will walk away with everything above

! Oh ya that's some great hair days comin your way! Use the rafflecopter entry below, for each step you complete you'll gain an additional entry, but you're not required to complete them all. Good Luck!

Follow on Bloglovin

DITCH THE UV: LOREAL GEL LACQUE IN RADIANT ORCHID

AT HOME NAIL GEL, NO UV LIGHT, RADIANT ORCHID MANICURE

Orchid Gel Color (Miss Luster-ess)

2014 is off to a great start- including the announcement of the

Pantone Color of the Year: Radiant Orchid

. Purple has always been a go to color in my makeup bag, and you'll often find me wearing my favorite

purple tang eyeliner

90% of the time. I've even begun wearing shades of purple on my lips so I feel like I am completely on par with this years' it-color.

But, if you read my blog regularly you know that

nail polish & Megan don't mix

. Not because I don't love the way it looks of course, but because it just isn't practical with my day to day job at the salon. My hands are in water all day, and therefor polish has no chance of survival. DOA, if you will.

When I am feeling the need to decorate my digits, I usually go for decals or gel so I get a few more days of wear out them. And while I do have a UV gel lamp at home, I wanted to test out the latest in gel... the non UV version.

Loreal has recently introduced a three step gel system called

Extraordinaire Gel Lacque 1-2-3

. I picked mine up at Target but the starter kit with the 1-3 polish can be hard to find so you can also

buy online

. The system has three parts: a primer, a gel color, and a glaze overlay.

I tested the system two ways. First without pre-buffing the nail, and then again with buffing before application. And just like I have experienced with ALL gels... if you don't pre buff to roughen up the nail bed and give it some added

grip

, the gel will peel off too easily (about 2 days). I think this is because the gels are much thicker on the nail when dry, and because of that there is often a discernible edge near the cuticle that can easily catch and then lift off the gel in one large sheet.

colors available

So learn from my mistake and use a fine particle nail file or buffer to slough off the sheen of your nail, then cleanse well with a little rubbing alcohol before beginning the painting process.

The layers go on very easily and surprisingly cure very quickly. So even though you're using three layers, I didn't feeling like my waiting time was any longer than with traditional polish, if fact I think it was quicker! Your left with a brilliant shine and the thickness of a gel that is great for protecting the nail and for longer wear. I got about 6 days out of mine, so it's definitely longer lasting than traditional polish, but not quite as long as a salon gel manicure.

I will be adding more of the Gel Lacque colors to my collection for sure, and I will experiment with the thickness of each coat to see if I can stretch the staying power a little longer. Have you tried any non-UV gels that I need to know about? Let me know in the comments below- and be sure to sign up for email on the left side bar, so that you never miss a snoop!

Follow on Bloglovin

STYLEWISE: ROCK STAR WAVES

Bed Head Deep Barrel Waver

Star Necklace

 |  

Orange Lips

It's time to get

StyleWise

! Today I decided to rock a little edgier look- but let's face it... I still look pretty girly wearing sparkles and hot pink. I tried.

beachy waves, rocker waves

For this fun look I used my

Bed Head Deep Barrel Waver

to simply place a single row of waves in the

mid-section of my hair, and left the ends stick straight to finish the look with a 'tougher' vibe. This look works best for shoulder length hair or longer, and I recommend you don't start your wave any higher than cheekbone level.

To start, work with straight hair that is parted near the center (this also key for the rocker look). Next section the hair so you can start waving from the bottom near the nape of your neck, and pin everything else up out of the way.

Place the waver at the base of the hair near the nape, using a large 2-inch horizontal row, and clamp down. Heat through for 6-10 seconds and then release- you'll find a 3-shaped wave has formed and your ready to repeat on all subsequent sections. Make sure you hold the waver with the same orientation on both sides of your head. I like to have the bottom flatter side closest to my face- this way the wave peaks and valleys are the same on both sides.

Remember that you want all the waves to be focused in one visual 'row' around your head, so this means that you may need to place the waver in using visual markers. For example, each strand would be clamped higher on the strand for the underneath pieces or lower on the strand for the top pieces, with the goal to keep the wave line consistent near your cheekbone.

Follow up by running your flat iron across the ends to get a smooth, pin-straight finish. A little fluffing and some hair spray, and your ready to rock! This

deep barrel waver

is really affordable, and comes in handy for lots of styles. You can create faux-finger waves, Victoria Secret volume, and effortless beachy looks in a snap!

Thanks for your love and support! I am so grateful for all of you- seriously.

For more fun please follow along with me on

instagram

! @beautysnoop

Follow on Bloglovin

THE ONE PRODUCT I CAN'T LIVE WITHOUT: THE POWER OF VITAMIN C

IMAGE SKINCARE VITAL C SERUM REVIEW

It happens a lot.

I meet someone new, and after introductions and small talk- I mention that I am a beauty blogger.

Then this happens...

"ok, so what is your number one product you can't live without?!?"

Seriously. All the time.

It's a great question, and one that I completely understand because the world of beauty is HUGE, and sometimes overwhelming. Many of you have mentioned to me that Sephora gives you panic attacks, and rightfully so- can you say 'sensory overload?'

But, the last time I got asked this question (less than 2 weeks ago) - I really pondered my answer. What is the ONE product I go back to time and time again? The one that causes me to cry when I pump out the last drop in the bottle? [ok, maybe I don't actually cry when I run out... but I DID actually cry when the spa I used to purchase it from closed. But, don't worry- I found another one! YAY]

Enter:

Image SkinCare- Vital C Hydrating Anti-Aging Serum

This little bottle of goodness has never let me down, and I swear by its' healing power. It's part of the Vital C line from Image, which

uses the power of anti-oxidants and Vitamin C to help skin block free-radicals in the environment which cause aging

. Other power house ingredients include: hyaluronic acid, green tea, algae, and grape seed extract. Can't you just feel the amazingness?

I was introduced to

Image

by a dear friend who is a master skin therapist, and it's now been three years since I began using it. I've tried lots of their products and have enjoyed all of them (the Clear Cell line is amazing for acne too!) but, without a doubt the Serum is my hero product of them all.

I use this bad boy morning and night after cleansing, it absorbs quickly and never leaves me feeling greasy. It is wonderful for inflamed or sensitive skin, those with rosacia, and you guessed it... acne sufferers like me. I believe this serum has done more for my acne scars then anything else out there, and it continues to help fight acne by helping with cell turnover and healing.

I seriously cannot gush enough about it! The only tricky thing with Image products is finding them. They're not sold online (which is good because it keeps counterfeits from ruining the integrity of the line) so you have to track down a professional treatment spa that carries the line near you. Just give their location finder a call, and they'll point you in the right direction. 

1.800.796.SKIN 

So if you've been thinking it's time to start treating your skin a little nicer, but you're not ready to throw down hundreds of dollars on luxury creams or treatments... this is a great place to start. I know you'll love the power of Vitamin C as much as I do! Here's to glowing skin, xoxo

Follow on Bloglovin

THE PRIME OF YOUR LIFE: BEAUTY PRIMER WINNERS

essie protein base coat, NS Minerals eye primer, Alterna Style Prep, Benefit Porefessional

I'll be the first to admit that some products out there (and in my drawers) are just 'fluff' products. They are kinda nice to have, but they aren't by any means necessary to own or use. When I de-clutter my makeup stash, it's the fluff products that always find the bottom of the garbage can first, because they take up valuable storage room, and don't give me any real payoff.

But one thing that I have learned in my beauty career is that primers can make all of the difference when it comes to the performance and longevity of your other products. A good primer is essential in my eyes and can easily replace 2-3 fluff products while getting you better results.

Why go through all the work of applying makeup, or styling your hair... or the time consumer of them all... painting your nails- just to have all that work go to waste!?! Seriously, stop doing that to yourself and invest in some top notch primers, you won't regret it! Remember that

the purpose of any primer is to prepare the surface to receive the subsequent products better

, with longer lasting results.

Best Nail Primer:

Essie Protein Base Coat

Nail care is not my strongest suit, mostly because I work with water, shampoo, and color every day so my nail polish has a slim chance in Hell of surviving more than 24 hours. But, when I do take the time to paint my nails, I want to be sure the color lasts as long as possible. I love this nail primer because it also strengthens the nails with its' protein ingredients. One coat of this dries quickly and provides a smooth surface to paint over. Your polish will last longer and the added layer gives a nice rigid protection to the nail itself so your less likely to break a nail when your popping open that morning can of Diet Coke. No? Just me? Ok.

Best Hair Primer:

Alterna Caviar Style Prep

Style Prep is my go-to detangling spray that is lightweight and smells amazing, BUT what it really does is even out the porosity of the hair so that all of your styling products absorb evenly and spread more easily. It also helps to repel water out of the hair so that your drying time is cut down significantly. This is the first product you would apply to your hair right out of the shower, then comb it through with your wetbrush or wide tooth comb- followed by any mousses, gels, creams, or oils that you use to style.

Best Skin Primer:

Benefit POREfessional

Makeup priming may be the most important of them all, and anyone who struggles with uneven pigment or oily/acne prone skin knows this first hand. I love the POREfessional primer because it is fairly lightweight and absorbs quickly, but it does a great job a filling in fine lines and large pores. Think of it as prepping the canvas prior to painting. Makeup primers typically help absorb some of the natural oils in the skin too, which helps makeup stay put with less slipping throughout the day.

Best Eye Primer:

NS Minerals Eye Primer

I am a big fan of NS Mineral makeup, but my favorite product from the line is their Eye Primer. It's unassuming on the outside, but this little tub packs a punch! It's a cream-to-powder finish formula that's not too liquidy- so it never creases or runs. And it has major staying power which is essential if you are wearing loose powder shadows. A swipe of this stuff across the lid will give your shadows the boost they need to be brighter in color and stay put the whole day. It's great for any work with photo shoots or bright lighting because it really holds up under heat well.

So there ya have it- the prime of your life is just around the corner! Do you have a favorite primer I need to try? Let me know in the comments below, and thanks for reading!

Follow on Bloglovin

MASKCARA III-D FOUNDATION: THE BEST OF HIGHLIGHT AND CONTOUR

HIGHLIGHT AND CONTOURING MAKEUP BY MASKCARA

I remember a concept I studied during my senior year of high school in my Art History class. The concept was 'chiaroscuro' and essentially it is the use of light and dark to create dimension and shadow in paintings. Honestly, I didn't retain much from high school, but for some reason that word and its meaning stuck with me, and has really helped me in my career in hair and makeup. 

The idea that faces are not one-dimensional, and indeed have so many angles, curves, and depths- is an idea that will change the way you apply makeup and give you better results. By using the light and shadows that our faces naturally have, and then enhancing them with the right makeup, the result is truly three-dimensional and much more attractive to the eye. 

In the picture on the left I am wearing traditional foundation, meaning it is a single color that is applied over the entire face. The result is OK- I mean it still looks a hell-of-a lot better than if I were to wear NO foundation! But if you look closely you can see that my face looks a lot flatter in the photo on the left.  It's harder to spot the depth of my bone structure, my forehead looks flat as a board, and my cheeks especially lack in shape. 

But in the photo to the right, I am wearing

III-D Foundation by MaskCara

, and the results are quite different. I am a big fan of MaskCara- she is a fellow beauty blogger who has had great success and is now producing her own makeup line. How cool is that!?! Her HAC-pack (HAC = highlighting and contouring) gives you all the tools you need to create this dimensional look. 

By using two shades of foundation, one to contour and one to highlight- you face takes shape and you'll get the effect of walking around with perfect lighting on you at all times. The creme foundation goes on easily, and you can layer to build up more coverage, or keep it light for a subtle glow. The yellow color acts as a highlight without looking chalky, and helps even out redness in the skin. It takes some getting used to- but I am pretty sure that

makeup will never be the same for anyone who switches to this technique

.

The creme blush and illuminator finish off the look and really make the face POP! I am wearing the blush color Shortcake in the pic above.  To learn more about the process of applying the III-D Foundation you can check out MaskCara's

blog

and watch her videos which are really helpful. 

What do you think? Have you tried HAC'ing yet? Let me know in the comments below, and be sure you come say hello over on

instagram

and

facebook

.

Follow on Bloglovin

A NEW CLASS OF MAKEUP BRUSHES: THE ONE

|

Becca The One Perfecting Brush

|

If your bathroom counter looks anything like mine, you may agree that makeup collections can easily take over your space. I am a big believer in products and tools that multi-task and this new brush from

BECCA

Cosmetics does just that. So knock out some of that clutter, and take a look at this:

You can achieve a flawless finish for your whole face with the One Perfecting Brush

without having buy a whole arsenal of brushes. It's kind of genius really, and in my opinion its the new breed of makeup brushes. 

The

BECCA One brush

is made from a super soft goat hair and that alone makes this brush worth it. Cheap brushes are made with cheap fibers that harden and age so quickly. When you make an investment in a natural brush, you'll feel and see the difference with the very first use. 

The coolest part of the brush is its shape and size.

Without a doubt this is the largest brush that I have ever used

, which can be a little overwhelming at first. But with a little practice you'll learn the huge advantage of the large size. It sweeps over the face so quickly and efficiently that you'll never miss a spot, and blending your color into your neck and chest is a snap!

Turn the brush on its corner and use the precision of the the square end to highlight your cheekbones or sweep blush over the apples of your cheeks. Then run the end down your nose and sweep under your eyes.

I love to use the length of the brush to give me a perfect contour under the cheekbone, by sweeping my bronzer up towards the hair line above my ear. It's fool-proof and so quick.

This brush can be used for liquids and powders and transitions seamlessly

through your routine from one to another. It also washes really nicely which is not always the case with white bristles. 

I can't wait to get my hands on more

BECCA

products, available exclusively at Sephora. Let me know if you've tried any of their other goodies in the comments below. I really want to try the

Hint of Tint

for my cheeks this winter! Thanks for reading, and be sure you come say hi on

facebook

Follow on Bloglovin

Courtesy sample products of Becca Cosmetics were provided to The Beauty Snoop

HOW TO NOT GET A BAD HAIRCUT: WHAT YOUR STYLIST WON'T TELL YOU

preventing a bad haircut, rules for a good haircut

So you've been burned before. Figuratively. Maybe literally. Hopefully not. We have all had haircuts thats made us cringe a little, or a lot- but it doesn't have to be that way. There is a method to getting a great cut every time, and I am going to tell you things your stylist may never will.

Ready? Buckle up.

Finding a salon & Stylist

Ask a REAL LIFE HUMAN that is wearing cute hair you like, 'hey, cute stranger- I love your hair. Do you mind if I ask what salon and stylist you see?'...

Real life can't be faked. Online life can be tweaked and altered, and yes sometimes completely faked. So while a great website is part of the picture, its not the whole picture.

Professionally lit photos and fancy graphic design are all fine and dandy, but REAL LIFE HUMANS matter more

If you can't ask a RLH, online research is also a great tool. But be weary of salons that only post photos of statuesque models that would still look beautiful with a bowl-cut. You want to be able to access real paying clients and their pictures so opt for a salon that has a current facebook or instagram account where you can see actual results from the stylists.

Call the salon and give specifics about your hair needs so they can match you with the best fitting stylist.

Saying things like, 'I am looking for a stylist who is great with short edgy cuts and color' or 'I have dense hair that needs extra time for styling'... will go along way for getting what you want. Calling blind with no guidance for the front desk is risky. Don't be annoying, but do be assertive.

The first time

Start with a 'shape-up'. So you’re in the chair with your new stylist that you've never met... Now may not be the time to ask for a brand new pixie cut a-la-Halle Berry. Stick with the basics first. A slight trim, add some layering etc. This will let you gain trust (or not) with that particular stylist, and then next time you'll decide to take the plunge and do the big chop.

If the stylist can't follow directions on the basics, or you just don't click... then you'll avoid a major catastrophe and be on your way.

Six weeks later

Now that you feel good about your stylist and their abilities, you can make a change in a bigger way. But first BE REALISTIC. Now is the time to be completely honest with yourself and your stylist about your ability to style your own hair at home, the amount of time you really spend getting ready, and how often you are going through the procedure. If you're not honest- you'll likely be disappointed with your hair cut.

Why? Because pony tails and short layers don't mix. Because curly hair is cut with a different technique than straight hair. Because wash-and-wear is not the same as blown out hair. And while some people are genetically blessed and look great no matter what, most people have a routine that they stick to, and your cut and expectations should be within those perimeters.

The right cut

Looking through images of celebrities for inspiration is great, but not always helpful. To start, do your best to look for styles were the texture of their hair is similar to yours. Cuts and colors can be altered... but textures are another thing. If your hair is baby fine, you'll never have the thick hair of Sofia Vergara. So don't even look at her! Instead look at images of Claire Danes, Gwyneth Paltrow, or Cameron Diaz for inspiration. Be realistic. You'll be much happier.

Three months later

Don't allow your stylist to get in a rhythm with you. Make it a point to check back in and reevaluate your hair and cut every 3-6 months. Offer new ideas or ask about new ways to style your hair so that you can keep variety in your life. It's great to be comfortable and to have a groove, but getting stuck in a hair rut is a bummer for all parties involved. So check in, and change it up!

The Bottom Line

While your stylist is a professional and should make suggestions & collaborate with you, it should be a conversation that is two sided. Plus, you know your own hair better than anyone, so be honest and communicate before the shears even touch your hair and you'll never get a bad cut again!

Cheers!

HOW TO: MIRACURL/CURL SECRET- VINTAGE WAVES

If you jumped on board with excitement and bought the easy-as-pie

Miracurl

or

Curl Secret

machines- this tutorial is perfect for you. If you've never heard of these gizmos or thought they looked too good to be true, this tutorial will show you one of the many ways that you can use these devices and get beautiful results in less than 10 minutes. I highlighted this beauty bad-boy in a recent appearance on Studio5 and in this post 

here

. I have become a big fan of these tools because they really are fool-proof and speed up style time, and who doesn't want that!?!

Check out the video below to learn how you can use the Miracurl (pro version) or Curl Secret (consumer version) to get an easy vintage waves

look

that is perfect for a night out or an upcoming Holiday party.

Love you all, thanks for stopping by today- see ya over on instagram for more fun-  

@beautysnoop

 Let me know in the comments below if you've tried the Miracurl and what your think about it!

Follow on Bloglovin

ASK THE EXPERT: WHAT IS MANUKA HONEY (AND WHY WOULD I PUT IT ON MY FACE?)

In part two of Natural Week here on the blog- I am answering another reader question:

'What is all this buzz about honey in beauty products? And have you ever put honey on your face?'

-Kristin

Oooh this is such a great question and I am so excited to delve into it with you. Honey has been getting a lot of press lately, and for good reason. It's anti-bacterial qualities are great for acne sufferers, and it's natural sugars are amazing at drawing moisture into your skin. Not to mention it is great for healing burns and minor cuts. Cool right!?!

Honey has been a natural remedy for centuries and its' healing properties are no myth. As of late, top beauty brands including the French luxury brand

Guerlain

has been harvesting the power of the bee and bringing it home to your bathroom. They even bought their own ISLAND where a rare bee is indigenous, so that they can source the honey themselves and maintain the integrity of the species. I have tried a sample of their Royale, and oh man... wish I could afford the whole bottle!

And while these luxury

creams

,

venoms

(yes venoms! dubbed natures' botox) and

masks

all deliver the amazing results of the bees super-honey... There is another way to introduce this stuff into your beauty routine for a little less money:

Manuka honey is a raw form of honey

, that comes from New Zealand. It hasn't been pasteurized or preserved, and can be eaten of course, but it is also an amazing facial mask. I have been indulging in a twice-weekly mask for the last few months for my research on this post- and I have been converted, to say the least.

Not all honey is created equally, so before you go squeezing that honey bear bottle from your pantry on your face- be sure you know the difference. There are ratings on the bottles that say something like +10, +20 etc. Those ratings stand for the amount of anti-bacterial qualities that particular batch contains (which is based on how and where is was harvested) The higher the number, the more potent the formula... and the more expensive. I use 24+ so I am getting some pretty serious action, but remember I am fighting acne.

Smearing sticky honey all over your face is weird. I totally get that.

But just about everything I do in my beauty routine these days is a little wacky...comes with the job. But here is the great part- my acne has subsided, my redness is tamed, and I can feel my face draw in the moisture in my products deeper than before.

By wearing this sweet mask on your face two times per week for about 20 minutes, you give your skin a fighting chance against bacteria, inflammation, and dullness. After your rinse the honey off- apply your night creams and feel in amazement the 'sucking' action your skin now has, to draw in the moisture from your products. It's remarkable, and I love it! It goes on THICK but as it warms against your skin it moves around quite nicely, and be sure to pull your hair back in a headband to avoid a sticky situation :)

You can pick up this honey at your local natural market but I have had better luck with variety online. I've compiled my favorites below, as well as some of the luxury bee products from above. If you give any of those a chance, please let me know!

Follow on Bloglovin

NOW TRENDING: GOLD MAKEUP (THE NEW NEUTRAL)

Too faced Candlelight Glow, Stilla Illuminating Balm, NYX Liquid Crystal, Makeup Forever Aqua Eyes, Loreal Flipstick

Here's the thing: I find that there are two kinda women out there- the women that LOVE gold and the women that LOATH gold. I don't know why its such a polarizing color/metal, but it just seems to be the case. 

Me? I am the former. I love me some

GOLD

! Jewelry, shoes, jewelry, makeup... and jewelry.

Today I am stopping by Studio5 again to dish about

introducing gold into your makeup routine

. Now before you get all crazy-eyes on me, hear me out. Gold, just like when worn in your outfit, is the accent color. Not the entire ensemble. Think of this rich tone as the extra touch of sparkle that sets everything off and completes a look. 

And here's the second thing: You can choose to wear gold in subtle ways or bold ways- so pick your poison, commit to it, and then love the heck out of it and you'll be right on trend for this season where

gold is the new neutral

When you want your gold to whisper:

  • Introduce a hint of the tone in your eyeshadow by swiping on a gold creme shadow right in the inner corner of the eye that graduates to another color towards the outside and up to the crease. I love NYX Jumbo Pencil in Gold for this because its creamy formula goes on so easily and blends seamlessly with other colors.

  • Add just a touch of gold highlight on the top of your cheekbone using the CandleLight Glow highlighter from Too Faced. This compact is perfect for adding a hint of sheen and the yellow and pink pairing make it literally perfect for all skin tones because the two colors balance and make a neutral. The palette will last you ages and you will get use out of it year round.

When you want your gold to talk:

  • Amp up your eyes by using gold liner to pair perfectly with rich black lashes. You can opt for a shimmer or glitter version- but remember that the gold doesn't have to carry across your entire lid. Try transitioning the liner 1/2 or 3/4 of the way into a rich brown or cool black to add just enough gold without looking costume-worthy. I love the Makeup Forever Aqua Eyes for my shimmer version, and NYX Liquid Crystal liner when I want to add glitter.

When you want your gold to shout:

  • Add some real pop with a liquid or stick highlighter on the cheekbone. The richer formula will reflect more light and give a glowy effect that lasts all day. Try the Stilla HD Illuminating Beauty Balm for a liquid version or Benefit Watts Up for an easier stick application. Both will add a dewey highlight to the cheek that screams glam.

  • Make your lips the statement feature by adding gold to the center of your pout. This lip ombre effect is easy to achieve with the duel sided lip pairings from CoverGirl. The Lip Blast Flip Stick (colors shown are minx and tease) has a great formula that wears well, but also blends beautifully. Start with the gold and make a circle shape in the center of your lips about a half inch in diameter (that includes both the upper and lower lip in one circle) Then apply the complimentary color to the outside of the circle and towards the corners of your mouth. A few good blots of the lips will blend the two tones together and create the illusion of fuller lips with a gold highlight in the center.

Remember to

focus on one area

as your accent and keep the rest of your makeup toned down and more simple. And experiment with tones that compliment your skin- coppers are deep golds look beautiful on darkers skined ladies, while cooler and lighter shades pair nicley with my fair skined friends.

Thanks for stopping by today- be sure you are getting social with me too!

Facebook

,

Instagram

and

Pinterest

is where you can find me. Adios!

Follow on Bloglovin

SERIAL KISSER- BUXOM LIPS 5 WAYS

If you have ever read my bio on the

about

page- you may have seen my quote about the power that comes with a perfect shade of lipstick. On the surface that may seem like a bold quote that borders on the edge of 'shallow', but if there is one one thing that I have learned over my career- it is that women deserve to feel confident and beautiful at every opportunity they can get.

When I am in a hurry to get out the door without a full face of makeup- I still reach for lip color to amp up the volume of my look with minimal effort. And on the flip side, when I am in glam-mode and want to complete my look, lipstick is always the final touch.

I have been a HUGE fan of Buxom cosmetics since the get go, and my love of their

glosses

has been splattered all over these blog posts in the past. But I wanted to branch out and try the

Buxom Full Body Lipsticks

too- and then the perfect storm happened:

This limited edition (sold out in stores, so buy online) set called

Serial Kisser

- gives you five shades to try in mini version. I jumped on it because I know it won't last, and it's a great way to sample the shades and then purchase the full size sticks of your favs later. (although, for mini size- they're actually very generous)

Seriously, all five shades are gorgeous and truly cover all your bases for shades you'll ever need. The two that stood out the most for me are

Menace

and

Centerfold

. (all the Buxom names are hilarious and fun too!)

The formula is just like I expected it to be; buttery and perfect. Seriously, Buxom has the formulas for lips down pat! The coverage is also quite opaque but still has a semi-gloss sheen.

If you've been toying with the idea of jumping on the lipstick train- this is the way to go.

* * *

Okay- can we take a brief pause to check out the cutest dress that I am wearing in these pics!?! It is from

JunieBlake

 and I am a little bit obsessed with it.

JunieBlake makes adorable dresses and clothes- and this

Corrine

dress

(c/o)

was my perfect choice for this post, because every lipstick pops with these fun colors on the dress.

I am excited to wear it with tights and fall boots too- who says you can't wear bold color in the winter.?

Shop JUNIEblake

 |   

JUNIEblake facebook

  |  

JUNIEblake Instagram

Thanks for stopping by today, and don't forget to go back to last weeks' posts and enter my two huge giveaways happening right now. You could win a jackpot of unique hair products, or a $600 stroller. Whaa!?!!

MOMMY STYLE MUST HAVES + A STOKKE® SCOOT™ STROLLER GIVEAWAY!

Stokke Scoot giveaway

Stokke® Scoot™

  |   

The Wet Brush Mini

  |  

Vaseline Baby

  |  

Aveeno Sensitive Makeup Remover Wipes

  |  

Buxom Lip Cream

  |  

Marc Jacobs Beauty Concealer Pen

  |  

Ju-Ju Be Diaper Bag

Little bambinos are great accessories in themselves, but I still want to look chic and feel put together when I am out with my girls. Above you'll see the products that I always have with me at all times- They work in a pinch to freshen up while on the go, and they also keep my girls looking tidy and neat as well. I live and die by my Marc Jacobs concealer pen, and I have found 101 uses for a tub of Vaseline. Throw in makeup remover wipes, a mini version of my favorite Wet Brush, and the perfect shade of lip gloss... and you have everything you need in your designer diaper bag! 

See that

GORGEOUS

RED

stroller!?! It's my pride and joy these days- I take it everywhere I go, and get compliments on its' sleek design at least once a day. It's the 

Stokke® Scoot™ 

and I am so excited to be 

partnering

 with them today to offer one of my readers a stroller just like mine. We can be chic-momma twins! 

Shop Stokke

|  

Stokke Facebook

  |  

Stokke Twitter

  |  

Stokke Pinterest

  |  

Stokke Instagram

The 

Stokke® Scoot™

works for me because it is light weight for a full-size stroller, and is convertible to a forward or rear facing seat. Now that Zoey is a big girl she loves that her seat is up high and facing the world. And I love that it folds away so compactly, and with just one hand so that I can throw it in my trunk in a snap. Beyond the look of the stroller, 

the quality is exceptional

- you can just tell the difference in the fabrics, zippers, wheels, and even the stitching. This is an investment piece that you'll get years of use out of. 

If you haven't checked out all of the

Stokke

®

 products, you need to ASAP! I also have their highchair and it's one that I'll keep forever because it's design is so simple and it looks like a piece of furniture that

belongs

in your house. 

Be sure you enter to win your own 

Stokke® Scoot™

using the rafflecopter entry below. Good Luck, and thanks to Stokke® for sponsoring this chic-momma giveaway!

Follow on Bloglovin

a Rafflecopter giveaway

This post was sponsored by Stokke- thank you for supporting the brands that support this blog 

BEAUTY PRODUCTS YOU'VE NEVER HEARD OF BUT CAN'T LIVE WITHOUT (PART II)+ GIVEAWAY

T3 shower head, Pureology dry conditioner, batiste dry shampoo, harry josh dryer, cricket olive oil combs, sam villa texture iron, miracurl, turkish hair towels, lush bar shampoo, spin pins

My outfit details: Top:

Kingdom and State

 Waxed Denim:

Current/Elliot

Styling by LolaBella Boutique, thanks!

Oh my! This is a big one! I have a feeling this post will contain entirely too many exclamation points- but I am so thrilled with Part II of the

Snoop List: Hair Edition.

Today I am over at Studio5 highlighting the hair products and tools that you've never heard of, but CANNOT live without. This list is dear to my heart, because as you know I am still a hair stylist and salon owner, and hair has been my life for more than the last decade. So lets jump in and talk about all this goodness!

1

Goody Spin Pins

Spin pins do the work of 10 

traditional

 bobby pins combined

. Their unique corkscrew shape grabs on to hair and secures it effortlessly for hours without damaging hair. If you love a high bun or a 

tousled

 date-night updo... you must have these in your 

arsenal

. I will love these things until my dying day. Seriously. 

2

Babyliss Miracurl

 (Pro Version)

Conair Infiniti

(Consumer Version) It's the latest gizmo in hair curling, and let me tell you this thing is crazy cool. The barrel draws in a strand of hair and spins it until the length of the hair is wrapped around the internal barrel. Next it holds it there until fully cooked and then

spits out a perfect curl every time

. It has customized controls so you can dictate the heat and timing, as well as which way the curl wraps. If you struggle with a curling iron- meet your new best friend.

T3 Shower Head

If you can't keep your color looking fresh, or your hair and skin are as dry as the sands of the Sahara... it may be your water that is letting you down. The T3 shower filter

eliminates more chlorine

in your water than any other type of filter on the market. You will notice a difference in your hair and skin after a single use, and anything afterward that isn't T3...won't be good enough. It is a life changer. (This even helped me get over my hatred of showering. Baths > Showers. but that's a whole other issue :)

Turkish Hair Towel

Curly haired ladies have known the secret of non terrycloth towels for a while now. But for those of you who think I am insane... hold your tongue. These super absorbent cotton 

towels

 have a smooth surface but

absorb just as much as water

a traditional (american) towel. Because it has a refined texture, it doesn't rough up you hair and cause frizz. Use it to blot moisture out of the hair especially for those of you who 'scrunch-dry' your curls. 

Harry Josh Dryer

 Cutest. Strongest. Smartest. Dryer. Ever. Harry Josh is a celebrity stylist who set out to design a lightweight and compact dryer that will stand up to the harshest conditions. As a hairstylist my self- I am LUCKY if a dryer lasts me two years, because of the amount of use I put it through at the salon. This French-made power house will

last you 15 years

if you use it for 20 

minutes

 a day. (It dries my hair in 3 minutes flat. #noreally) It is an investment piece, but it is worth every penny and there isn't a single bad review out there on this guy. One of the coolest features is the ion function which can be turned off for more volume, and turned on for a sleeker finish. Custom is king. 

Cricket

Ultra Smooth Detangling Brush and Combs-

Stop stretching out your strands and start using a friction free comb fortified with olive oil. These combs have

a glass-like finish that glides through the hair

without tugging and helps to smooth the cuticle surface. Great for days when you air-dry your hair and makes a perfect shower comb to distribute your conditioner. The new detangler version uses short flexible bristles and  a 

sleek 

handle for extra control, so that you can detangle with one hand and restrain your screaming 5 year old with the other... have I mentioned her before?

Sam Villa Texture Iron

 + [additional 20% off with code: 20FORUT] When you need a lift, you need Sam Villa. Not only is he my personal hair-hero (and the sweetest guy!), he designed the Texture Iron to give you micro texture that gives your hair the oomph it so 

desperately

 needs. Use this guy to crimp the hair right at the scalp and

double the thickness at your roots instantly

. Use it to fatten-up your braids, buns and twists too. Avoid teasing and start texturizing instead!

LUSH Solid shampoo and conditioner

Who says shampoo has to come in a bottle!?! LUSH shampoo and conditioner bars are perfect for travel & your gym bag, while offering little bits of luxury with their organic and plant based ingredients.

The smell on these guys is hypnotizing

and the experience of using them will leave you feeling like you had a quick trip to the spa in your own shower. Let's face it... anything by LUSH is amaze! 

Batiste dry shampoo for brunettes and redheads

 I know they say 'blondes have more fun' but I tend to 

disagree

 since I am currently sporting a brunette hue. That being said, I have noticed that my brown and red-haired sisters often get left out of the dry shampoo conversation, and this just cannot be! Batiste dry shampoos for brunettes and gingers offer the same

great results without leaving a white powdery finish

on the hair. So go ahead, skip the shower today... and tomorrow!

10

Pureology Dry Conditioner (

Professional Salons

) What? Dry Conditioner!?! Yes, you read that right- and you need this stuff in your life ASAP. We all know that washing every day is a no-no, and that dry shampoo rescues your roots from the grease-bomb explosion on day 2. But what about those ends? They need some loving too, right? Dry conditioner is applied to the mid lengths and ends of your hair to

infuse it with a burst of moisture and shine

on the days when your not washing and freshly styling your hair. Use it to revive fuzzy curls and split end-i-fied locks and you are good to go [again].

There you have it! My

top hair picks for 2013

-- Which one do you need in your life? Let me know in the comments below and be sure you enter my giveaway. One winner will receive:

  • LUSH Shampoo and Conditioner bars

  • Cricket Olive Oil Combs

  • Batiste Dry Shampoo for Brunettes & Red Heads

  • Goody Spin Pins

  • T3 Shower Head

Good luc

k!

Follow on Bloglovin